We had this couch:
Midcentury modern, retro, 50s, 60s, whatever. Kim grabbed it
at the local discount furniture outlet for about 60 bucks. It’s 6 feet long,
and upholstered in off-yellow vinyl or leather or pleather or somesuch.
And I hated it. It had no arms. I mean, look at it:
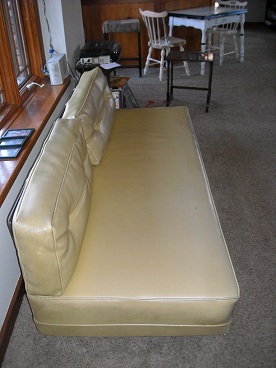
And the cushions were held up by this rickety scaffolding
that was attached to the base of the thing, without much thought to support. So
if you sit in the middle, the two cushions squish down and your back is rubbing
on spiky metal.

Not comfy.
So I said that I hate it, and Kim said, “Tough. Live with
it.”
And history was made.
Inspired by this project, I went out,
bought a ton of black metal and galvanized piping, and I was off.
The Plan
This took a lot of measuring and planning, and some dry run
trips to Lowe’s (more on them later). The raw materials would eat up all 150
bucks of my savings, but I thought it worth it for essentially a brand new
couch.

Essentially, I bought all the pipes and put them together, spray
painted them, and attached them to the couch.
The Problem
Okay, so I bought the wrong pipes a bunch of times, and had
to go back 3 times to Lowe’s to come up with all the parts that I needed, but
the big problem wasn’t execution, it was planning. You see, in order to make a
rectangle with threaded pipes and fittings, something, at some point, needs to
be reverse-threaded. Let me explain:
Say you have the piece for a rectangle, which includes four
sides and four right-angle fittings. With me so far? Now, you put them together
so that you have three sides and all fittings. Now you screw in the last side
on one end – perfect – and then try the other end. It goes in, but the other
end (the perfect one) unscrews itself. See what I mean?
This was my resolution:

Basically, we were using ½ inch pipe, so I bought T fittings
that had the two ends ¾ inch and the side ½ inch. This allowed me to pull the ½
inch bar through the straight part of the fitting. Thus, if I put the parts
together in the right order, everything would go together. Drill a hole through
the fitting with my Dewalt Titanium drill bit (easy as pie) and blast a
self-threading screw in there, and it’s good to go. As you’ll see, I did that
four times.
The Process

First, I cut a 1x6x6 down to the right size, cutting the ends at a 45-degree
angle so they wouldn’t peek out from under the couch so much. Then I attached
that to the bottom with screws to reinforce the whole frame and give the rear
legs somewhere to grab.

Second, I bought all the pipe pieces and put them together.
Then I went back to Lowe’s and bought more pieces. Then I did that again. Then
I had them all, and did a test run.
I laid them all out and washed them with dish soap, because
they all had this oily coating that keeps them from rusting.
Once they were dry, I assembled the frame outside and Kim
and I spray painted it. After two days of curing, I attached it with 20
self-drilling, star drive wood screws and BOOM! couch:


The Ingredients
I know this sounds like product placement (if only it was!),
but Lowe’s was essential. I took two 10-foot lengths of pipe and had the
awesome dudes at Lowe’s cut and thread them for me. It would have cost over 40
bucks to buy the smaller pieces individually, but I got them all for around 12
bucks and 10 minutes’ wait.
So we used:
1x6x6 pine board, cheap as I could find
1 10 foot galvanized pipe
1 10 foot black metal pipe (slightly cheaper than galvanized
and, hey, we were gonna paint it)
11 ½ inch L fittings (right-angle fittings)
2 ½ inch T fittings
6 of the aforementioned ¾ to ½ T fittings
2 eight-inch lengths of ½ inch threaded pipe
2 ½ inch flanges
6 ½ inch pipe straps
Tools:
Miter saw and stand. I got the saw for Christmas and bought
the stand at Lowe’s, because a miter saw’s no good without a stand. I didn’t
really need the saw, since I could have gotten the lumber cut to fit, but I
really really wanted to use it, and it’s awesome.
Electric drill (no substitution is possible)
1 ½ inch star headed self-driving exterior wood screws,
which rarely strip out or shear off, unlike cheaper woodscrews that I’ve used
in the past.
Lessons learned:
1)
Preparation is the key, baby. We thought about
this project for forever, and did a couple of dry runs and lots of other prep.
In the end, it went together easily, but only because it was ready to.
2)
You can’t make rectangles with threaded pipe.
This has already been covered.
3)
When you’ve help create or improve something, it’s
so much harder to hate it.
One more time:

BOOM! couch.
Thanks for reading.
No comments:
Post a Comment